banner


How To Repair Dtlapc 14-1

Introduction

Use this guide to supercede the display in a Late 2022 MacBook Air (M1).

    • Before starting this procedure, yous should disable your Mac's Motorcar Boot feature. Car Boot powers on your Mac when you open the hat, and may exist accidentally triggered during disassembly. Use this guide to disable Auto Boot.

    • If your MacBook is running Big Sur v11.one or afterward, disabling Auto Boot may non work. You can go along normally, simply brand certain to disconnect the battery as soon equally yous're inside.

    • Completely power off and unplug your MacBook before you get-go. Close the display and flip the unabridged laptop upside-down.

    • Use a P5 driver to remove the post-obit screws:

    • Two 7.9 mm screws

    • Two 7.3 mm screws

    • Six two.6 mm screws

    • Throughout this repair, go along track of each screw and brand sure it goes dorsum exactly where it came from to avert damaging your MacBook.

  1. Wedge your fingers between the display and the lower case and pull upward to pop off the lower case. Remove the lower case. To reinstall the lower case:

    • Wedge your fingers between the display and the lower case and pull upwards to pop off the lower case.

    • Remove the lower case.

    • To reinstall the lower case:

    • Gear up it in place and press firmly to engage the 2 hidden clips underneath. You should experience and hear them snap into identify.

  2. Use the flat end of a spudger to pry up and unlatch the metal locking arm on the battery connector. Make sure the metal arm is completely free of the locking tab before lifting the battery connector. The metal locking arm should easily unlatch. Lift straight up on the metal locking arm to pull the battery connector out of its socket on the logic board.

    • Use the flat cease of a spudger to pry up and unlatch the metal locking arm on the battery connector.

    • Make sure the metal arm is completely complimentary of the locking tab before lifting the battery connector. The metal locking arm should easily unlatch.

    • Lift direct upward on the metallic locking arm to pull the battery connector out of its socket on the logic lath.

    • During reassembly, press the battery connector straight downwards into its socket, making sure it sits flush within the socket.

  3. Use a T3 Torx driver to remove the 1.4 mm screw securing the antenna cable cover.

    • Utilize a T3 Torx driver to remove the 1.4 mm screw securing the antenna cable cover.

    • If your T3 fleck feels a chip besides loose, y'all may need to apply a T4.

  4. Remove the antenna cable cover.

    • Remove the antenna cable comprehend.

  5. Use a pair of tweezers to grip the antenna connector close to its base. Pull straight up to disconnect the cable. Repeat for the second antenna cable.

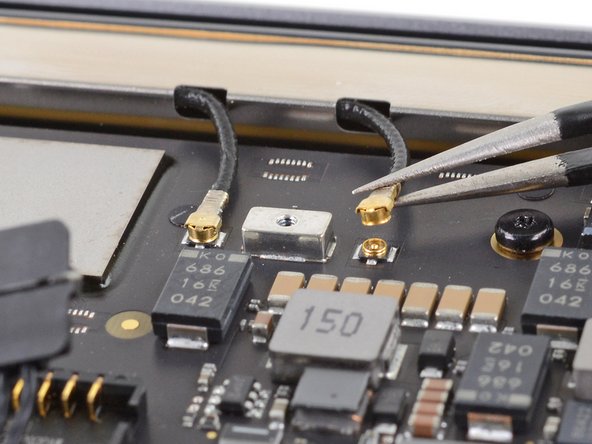
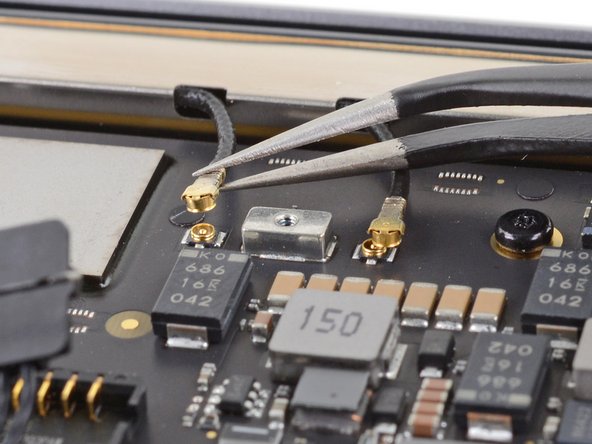
    • Use a pair of tweezers to grip the antenna connector shut to its base of operations.

    • Pull straight upward to disconnect the cablevision.

    • Repeat for the second antenna cablevision.

  6. Use a T3 Torx driver to remove the two 1.5 mm screws securing the display cable connector cover.

    • Apply a T3 Torx driver to remove the 2 i.5 mm screws securing the display cable connector cover.

  7. Remove the display cable connector cover.

    • Remove the display cable connector cover.

  8. Use the flat end of a spudger to pry the display cable connector straight off of the antenna board to disconnect it. To re-attach press connectors like this one, carefully align and press down on one side until it clicks into place, then repeat on the other side. Do not press down on the middle. If the connector is misaligned, the pins can bend, causing permanent damage.

    • Apply the apartment end of a spudger to pry the display cable connector straight off of the antenna board to disconnect it.

    • To re-attach press connectors like this ane, carefully marshal and press downwardly on 1 side until it clicks into place, then echo on the other side. Exercise not press down on the middle. If the connector is misaligned, the pins tin can bend, causing permanent damage.

  9. Use a T5 Torx driver to remove the six screws securing the antenna bar:

    • Apply a T5 Torx driver to remove the six screws securing the antenna bar:

    • Four 7.4 mm silvery screws

    • Two 4.7 mm black screws

  10. Insert the pointed end of a spudger into the gap between the antenna bar and display hinge. Pivot the spudger against the hinge to pry up the end of the antenna bar. Repeat for the other end of the antenna bar.

    • Insert the pointed terminate of a spudger into the gap between the antenna bar and brandish hinge.

    • Pivot the spudger against the swivel to pry up the end of the antenna bar.

    • Repeat for the other end of the antenna bar.

  11. Use your fingers to pry the antenna bar straight up and away from the case. The antenna bar is secured with some adhesive and may require some force to dislodge. Thread the antenna board through the opening in the middle of the antenna bar.

    • Use your fingers to pry the antenna bar straight up and away from the case.

    • The antenna bar is secured with some agglutinative and may require some strength to dislodge.

    • Thread the antenna board through the opening in the middle of the antenna bar.

    • Exist careful to non put whatever strain on the antenna bar's ribbon cables.

    • Remove the antenna bar.

  12. Use a T8 Torx driver to remove two 5.0 mm screws from each hinge (four screws total). Each hinge has a third central screw, which you should leave in place for now.

    • Use a T8 Torx commuter to remove ii 5.0 mm screws from each hinge (four screws total).

    • Each hinge has a tertiary central spiral, which you should get out in identify for now.

  13. With the MacBook still screen-side down, carefully lift the upper case to open the MacBook as far as possible. With the MacBook still screen-side down, carefully lift the upper case to open the MacBook as far as possible.

    • With the MacBook however screen-side down, carefully elevator the upper example to open up the MacBook every bit far as possible.

  14. Lift the MacBook up and place it on its side, with the display facing away from you.

    • Lift the MacBook up and place it on its side, with the display facing abroad from you.

  15. Use a T8 Torx driver to remove the two remaining 5.0 mm screws securing the display, one from each hinge. Once these screws are removed, the display will no longer be connected to the upper case. Hold both halves steady.

    • Use a T8 Torx driver to remove the two remaining 5.0 mm screws securing the display, ane from each hinge.

    • One time these screws are removed, the display will no longer be connected to the upper example. Hold both halves steady.

  16. Carefully begin to close the display until it's at a ~90 degree angle with the upper case. The hinges should pull out of the case slightly as the display is moved towards the case. Keeping the display at a 90 degree angle with the case, move the display away from the case while holding the case still, so that the hinges slide out the bottom of the case.

    • Carefully begin to shut the brandish until it's at a ~90 caste bending with the upper case.

    • The hinges should pull out of the case slightly as the brandish is moved towards the instance.

    • Keeping the display at a ninety caste angle with the case, move the display abroad from the case while holding the case still, and then that the hinges slide out the bottom of the case.

    • Remove the display.

Conclusion

Compare your new replacement office to the original part—you may need to transfer remaining components or remove agglutinative backings from the new function before installing.

To reassemble your device, follow the above steps in contrary order.

Take your eastward-waste product to an R2 or e-Stewards certified recycler.

Repair didn't become as planned? Check out our Answers community for troubleshooting aid.

Team

Embed this guide

Cull a size and copy the code below to embed this guide as a small-scale widget on your site / forum.

Preview

Source: https://www.ifixit.com/Guide/MacBook+Air+13-Inch+Late+2020+Display+Replacement/142554

Posted by: edensthinty.blogspot.com

0 Response to "How To Repair Dtlapc 14-1"

Post a Comment

Iklan Atas Artikel

Iklan Tengah Artikel 1

Iklan Tengah Artikel 2

Iklan Bawah Artikel